Letztes Update / Last Update: 2025-11-04
Jump to English VersionIch bin seit 1996 mit "Grand Prix 2" und "TOCA" im Simracing aktiv. Wegen fehlender Alternativen wurde damals nur ein Gamepad genutzt. Darauf folgte mit dem Saitek R440 mein erstes Lenkrad, sogar mit stehenden Pedalen :). Dieses wurde durch ein Logitech Driving Force GT mit einem damals fantastischen 900-Grad Lenkradeinschlag ersetzt. Hinzu kamen Spiele wie "Live for Speed", "GTR", "GT Legends" und "Richard Burns Rally". Gefolgt von einem Fanatec GT3 RS v2 Lenkrad mit CSR Elite Pedalen und "GTR2", "rFactor" sowie "Dirt Rally". Mit diesem Update musste die zuvor genutzte Tischbefestigung einem Wheelstand weichen.
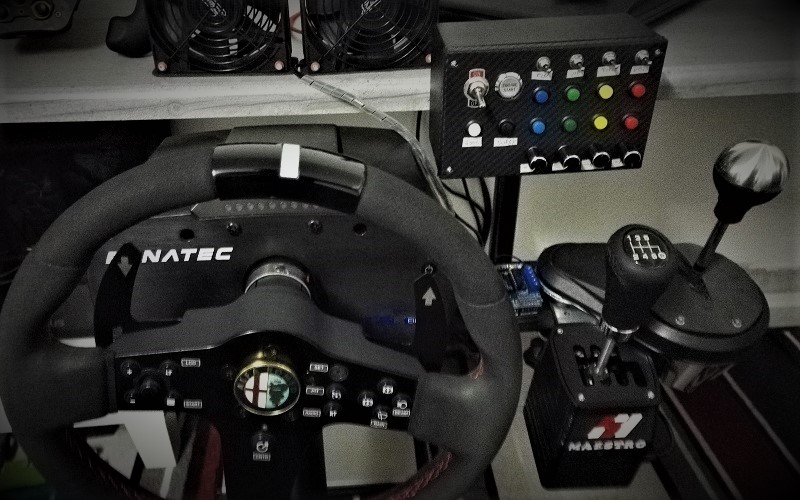
Als Wheelbase habe ich eine Fanatec CSL DD mit Boostkit (8Nm) in Verwendung. Mit 480€ nicht billig, aber klarer Preis-/Leistungsgewinner in dieser Klasse. Die Base ist mit allen Fanatec Lenkrädern kompatibel und mit Hilfe das Universal Hubs oder des Podium Hubs können auch andere Lenkräder verwendet werden.
Zuvor hatte ich das Fanatec CSL Elite+ in Verwendung. Hier musste man etwas auf das Gewicht des Lenkrades achten. Die Base war mit max. 6 Nm zwar zirka 3 mal so stark wie die Konkurrenz von Logitech, bei Lenkrädern über 2 kg und 350 mm Durchmesser wird das Force-Feedback dennoch stark gedämpft. Ein weiterer Vorteil war der Riemenantrieb, dieser ermöglicht eine sehr leise und geschmeidige Lenkung. Logitech hat hier z.B. Zahnräder. Meine jetzige CSL DD bietet Direct Drive.
Wer sich aber noch nicht sicher ist, ob das Hobby ihn dauerhaft unterhält kann mit einem Logitech oder Thrustmaster Set auch sehr viel Spaß haben. Ich glaube die meisten Simracer haben damit begonnen. Ich hatte beispielswiese 7 Jahre ein Logitech Driving Force GT. Damals gab es aber auch nicht wirklich was besseres in leistbaren Preisregionen.
Wer mehr Geld ausgeben kann und sich keine Upgrade- und Lenkradgewicht-Gedanken machen möchte sollte zu einem Direct-Drive greifen (z.B. SimuCube, SimMagic, AccuForce oder Fanatec DD1/2, CSL DD). Bei diesen Lenkrädern gibt es keine Zahnräder oder Riemen, das Lenkrad sitzt direkt auf der Motorwelle welche 20 Nm und mehr Drehmoment liefert. Preislich liegen die stärkeren DDs bei etwas über 1000€. Die Fanatec CSL DD mit 8 Nm Boostkit liegt bei 480€, die Basisversion bei 350€. Aber Achtung, bei mehr als 10 Nm Drehmoment können schon ernsthafte Verletzungen vorkommen, das ist kein Spielzeug mehr.
Ich habe noch immer meine 7 Jahre alten Fanatec CSR Elite Pedale in Verwendung. Wichtig bei Pedalen ist eine Kraftmesszelle (Load-Cell) am Bremspedal, das führt zu einer viel gleichmäßigeren und konstanten Fahrweise.
Preislich ist man ab etwa 180€ dabei (Fanatec CSL mit LoadCell Kit oder Thrustmaster T-LCM). Top Pedale gibt es z.B. von Heusinkveld um etwa 700€ (Sprint) bis 1300€ (Ultimate).
Derzeit habe ich einen SSH Newt in Verwendung. Dieser untersützt einen H- und einen Sequentiellen-Modus. Der Wechsel erfolgt ganz einfach durch runterdrücken des Schaltgriffs. Er wird in Spanien hergestellt und hat ein gewöhnungsbedürftiges aber individualisierbares 3D-Druckgehäuse. Der Peis liegt bei 100€. Alternativ gibt es z.B. den wesentlich teureren Fanatec Shifter.
Ich hatte auch den Thrustmaster TH8RS. Dieser kann sogar als Handbremse konfiguriert werden. Beim Umschalten zwischen den Modus muss aber jedes mal umständlich die Platte getauscht werden. Das Schaltgefühlt ist zwar gut aber beim SHH Shifter einen Tick besser.
Wer mit einer sequentiellen Schaltung auskommt findet am Mark sehr viele verschiedene Modelle in allen Preisklassen: Erwähnenswert sind hier z.B. Manu Factory Cambio sequenziale SSH oder Thrustmaster TSSH.
Ich hatte eine Zeit lang den Thrustmaster TH8RS als Notlösung im Einsatz. Jetzt probiere ich eine 50€ China Handbremse aus. Die befindet sich noch am Versandweg.
Wer keine Geldprobleme hat, findet bei Heusinkveld um 240€ eine sehr gute Lösung. Dazwischen liegt die Handbremse von Fanatec.
Um 50€ kann man einen guten DIY Windgenerator bauen. Dazu benötigt man einen Arduino Uno, ein passendes Motorshield und starke Lüfter. In meinem Fall sind es zwei, als Mining Rig gelabelte, 120mm Lüfter mit 200 CFM bzw. 4000rpm. Die freie Software SimHub erledigt den Rest. Sie ermöglicht die geschwindigkeits- und sogar richtungsabhängige Ansteuerung der Lüfter indem sie die Telemetriedaten der Spiele empfängt. Fertige Alternativen gibt es nur wesentlich teurer.
Ich empfehle die Windsimulation vor allem VR Fahrern, ohne VR Brille wird der Wind langfristig in den Augen stören.
Ebenfalls um rund 50€ kann man sein Rig mit DIY zum Beben bringen. Ich habe zwei 100W China Bass-Shaker mit einem einfachen China Stereoverstärker an einer eigenen USB Soundkarte (eigener Audiokanal) in Verwendung. Angesteuert wird das ganze wieder über SimHub. Bei Bedarf sind hier bis zu 8 Kanäle möglich. Schon mit 4 Kanälen kann man alle Ecken eines Autos abbilden. Für die Effekte werden wieder die Telemetriedaten aus den Spielen herangezogen. Bei mir befindet sich ein Shaker unter den Pedalen und ein weiterer unter dem Sitz. Das reicht erstmal.
Mit ButtKicker gibt es auch hier Komplettlösungen.
Fertige und günstige Lösungen mit Alu-Profil gibt es z.B. von Sim-Lab. Ich selbst hab mir meines nach eigenen Bedürfnissen selbst geplant und bei Motedis bestellt. Dort gibt es aber auch vorkonfigurierte Rigs (X-Dream, US-Dream). Preislich liegt man hier bei 300€ bis 400€ für die Einstiegsmodelle (ohne Sitz).
Alternativen gibt es natürlich unzählige am Markt: Next-Level-Racing, GT-Omega, etc. Aber an die Flexibilität eines Alu-Profils kommen sie selten ran, dafür können sie durchaus günstiger sein.
Hier kommt es sehr stark auf den Geschmack an: Verstellbarer Sportsitz oder Schalensitz, mit oder ohne "Ohren", Material etc. Ich habe mich für eine Vollschale entschieden, kann aber den "Ohren" am Kopfende wenig abgewinnen und habe deshalb den Mirco GT genommen. Der Sitz kommt aus Polen und hat ein tolles Preis-/Leistungsverhältnis. Dazu noch die QMS Befestigungswinkel und ein Sitzslider. Außerdem hab ich einen gebrauchten, sehr günstigen 3 Punkt Schroth Gurt gefunden - für noch mehr Immersion :)
Ich selbst hab keine Motion im Einsatz. Die Kosten dafür sind nicht zu unterschätzen, ab etwa 3000€ geht es los. Man unterscheidet nach möglichen Bewegungsachsen (DOF = Dimensions of Freemdom) und ob nur der Sitz (Seatmover) oder das gesamte Rig bewegt wird.
Beispiele:
Als Seatmover gibt es etwa die Next Level Racing Motion Platform V3. Sie wird direkt unter dem Sitz befestigt.
Die Next Level Racing Traction Plus ist eine 2 DOF Einheit die vor allem Unter- und Übersteuern simulieren soll.
Die SFX 100 Plattform besteht aus 4 Aktuatoren, welche das gesamte Cockpit an jeder Ecke hoch- und runterfahren können.
Werden solche Systeme kombiniert sind Bewegungen in insgesamt 8 Dimensionen möglich (8 DOF).
Bei mir kommt hier ebenfalls eine DIY Variante mit 32 Funktionen zum Einsatz. Wichtig war mir eine VR taugliche Anordnung der Tasten und Drehknöpfe. Die Kosten für eine Buttonbox beginnen bei etwa 60€.
Hier kann ich leider sonst nicht viel schreiben, außer das es hier ebenfalls extrem viel Auswahl am Markt gibt. Immer mehr verwenden auch ein Streamdeck als flexible Buttonbox mit mehreren Kontrollebenen. Das ist allerdings nicht VR tauglich.
Zusätzlich zu den Spielen brauche ich nur SimHub und AutoHotkey.
Leider ist das Thema extrem Umfangreich und daher ist das hier nur als kleine Übersicht mit meinen persönlichen Erfahrungen und Meinungen zu sehen.
I am a active driver of racing games since 1996 and it all started with "Grand Prix 2" and "TOCA" . Because of missing alternatives, a gamepad was used in this time. After that I got my first steering wheel with the Saitek R440. This wheel even had inverted pedals :). It was replaced with a Logitech Driving Force GT with a phantastic 900 degree steering wheel angle. Games like "Live for Speed", "GTR", "GT Legends" and "Richard Burns Rally" were also added to the collection. The next update were a Fanatec GT3 RS v2 steering wheel with the CSR Elite pedals and "GTR2", "rFactor" as well as "Dirt Rally". With this update the previously used table mounting was replaced with a simple wheel stand.
I use a Fanatec CSL DD with boostkit (8Nm) as a wheelbase. It is not cheap at € 480, but a clear price / performance winner in this class. The base is compatible with all Fanatec steering wheels and with the help of the Universal Hub or the Podium Hub, other steering wheels can also be used.
Before I owned a Fanatec CSL Elite+. With this base you had to pay attention to the weight of the steering wheel. The base has max. 6 Nm and is around 3 times as strong as the competition from Logitech. But with steering wheels over 2 kg and 350 mm in diameter, the force feedback is strongly dampened. Another advantage is the belt drive, which enables very quiet and smooth steering. Logitech uses gears, for example. My current CSL DD is a direct drive wheel base.
But if you are not sure whether the hobby will keep you entertained, you can have a lot of fun with a Logitech or Thrustmaster set. I think most sim racers started with this entry level wheels. I also had a Logitech Driving Force GT for 7 years. But at that time there wasn't really anything better in affordable price regions.
If you can spend more money and don't want to worry about upgrading and steering wheel weight, you should use a direct drive (e.g. SimuCube, SimMagic, AccuForce or Fanatec DD1 / 2, CSL DD). These steering wheels don't have any gears or belts, the steering wheel sits directly on the motor shaft which delivers 20 Nm and more torque. The price of the stronger DDs is around a little bit over € 1000. For 480€ there is the Fanatc CSL DD with boostkit (8Nm) and the basic version for 350€. But be careful, at a torque of over 10 Nm serious injuries can occur, this is no longer a toy.
I still have my 7 year old Fanatec CSR Elite pedals in use. A load cell on the brake pedal is important for pedals, which leads to a much more even and constant driving style.
Prices start at around € 180 (Fanatec CSL with LoadCell Kit or Thrustmaster T-LCM). Top pedals are available from Heusinkveld for around € 700 (Sprint) to € 1300 (Ultimate).
I am currently using an SSH Newt. This supports an H-pattern and a sequential mode. The change takes place very simply by pressing down the switch handle. It is made in Spain and has a customizable 3D printed case that takes getting used to. The price is €100. Alternatively there is, for example, the much more expensive Fanatec Shifter.
I also had the Thrustmaster TH8RS. This can even be configured as a handbrake. When switching between the modes, the shifter plates need to be swapped each time, which can get painful over time. The shifting feel is good but a tad better with the SHH shifter.
Those who get by with a sequential shifter will find a lot of different models in all price ranges at the market: Manu Factory Cambio sequential SSH or Thrustmaster TSSH are worth mentioning here.
I used the Thrustmaster TH8RS as an emergency solution for a while. Now I'm trying a € 50 China handbrake. It is still on the way.
If you have enough money left, you will find a very good solution at Heusinkveld for € 240. In between is the Fanatec handbrake.
For € 50 you can build a good DIY wind generator. For this you need an Arduino Uno, a suitable motor shield and strong fans. In my case there are two 120mm fans with 200 CFM or 4000 rpm, labeled as mining rig fans. The free software SimHub does the rest. It enables the speed and even direction dependent control of the fans by receiving the telemetry data of the games. Ready-made alternatives are just much more expensive.
I recommend the wind simulation especially to VR drivers, without VR glasses the wind will disturb the eyes in the long term.
You can also make your rig shake with DIY for around € 50. I use two 100W China bass shakers with a simple China stereo amplifier on a separate USB sound card (separate audio channel). The whole thing is also controlled via SimHub. If required, up to 8 channels are possible here. With just 4 channels you can map all corners of a car. The telemetry data from the games are used again for the effects. I have a shaker under the pedals and another under the seat. That's enough for now.
With ButtKicker there are complete solutions here too.
Ready-made and inexpensive solutions with aluminum profiles are available e.g. from Sim-Lab. I planned mine myself according to my own needs and ordered it from Motedis. There are also preconfigured rigs (X-Dream, US-Dream). The price is between € 300 and € 400 for the entry-level models (without seat).
There are of course innumerable alternatives on the market: Next-Level-Racing, GT-Omega, etc. But they rarely come close to the flexibility of an aluminum profile, but they can be cheaper.
Here it depends very much on the taste: adjustable sports seat or bucket seat, with or without "ears", material, etc. I decided on a full shell, but I don't like the "ears" at the head end, so I took the Mirco GT. The seat comes from Poland and has a great price / performance ratio. Plus the QMS mounting brackets and a seat slider. I also found a used, very cheap 3 point Schroth belt - for even more immersion :)
I don't use any motion by myself. The costs for this are not to be underestimated, starting at around € 3000. A distinction is made between possible axes of movement (DOF = Dimensions of Freemdom) and whether only the seat (seatmover) or the entire rig is moved.
Examples:
The Next Level Racing Motion Platform V3 is available as a seat mover. It is attached directly under the seat.
The Next Level Racing Traction Plus is a 2 DOF unit that is primarily intended to simulate understeer and oversteer.
The SFX 100 platform consists of 4 actuators, which can raise and lower the entire cockpit at every corner.
If such systems are combined, movements in a total of 8 dimensions are possible (8 DOF).
I also use a DIY variant with 32 functions. It was important to me that the buttons and knobs were arranged in a way that was suitable for VR. The costs for a button box start at around € 60.
Unfortunately, I can't write much else here, except that there is also an extremely large selection on the market. More and more people are also using a stream deck as a flexible button box with several control levels. However, this is not suitable for VR.
In addition to the games, all I need is SimHub and AutoHotkey.
Unfortunately the topic is extremely extensive and therefore this is only to be seen as a small overview with my personal experiences and opinions.